How to Learn Character Design When You’re Starting From Scratch
Character design can feel overwhelming because it combines several drawing skills at once.
You need to think about shape, proportion, pose, personality, clothing, expression, and visual storytelling. The good news is that you do not need to master all of them before creating your first character.
Start with simple forms. Then gradually add decisions that make the character feel recognizable and intentional.
| Day-One Metric | Beginner Target |
|---|---|
| Hours to basic competency | 20–40 focused hours |
| Minimum budget | $0–$20 with basic drawing supplies |
| Difficulty | 4/5 |
| Core skills | Shape, proportion, gesture, silhouette, expression |
| Best first project | One original character with 3 poses and 3 expressions |
What Should You Learn First in Character Design?
Do not start by designing elaborate costumes.
Learn three foundations first.
1. Shape language
Characters can communicate personality through their basic shapes.
Round shapes can feel soft or friendly. Angular shapes can feel sharp or aggressive. Tall, narrow shapes can create a very different impression from short, wide ones.
These are not fixed rules. They are visual choices.
Practice creating characters from circles, squares, triangles, and combinations of those forms.
2. Silhouette
A character should be recognizable even when you cannot see the internal details.
Fill the character completely black and look at the outline.
Can you still tell what the character is doing?
If the answer is no, improve the pose or silhouette before adding details.
3. Gesture and pose
A character standing stiffly can feel lifeless even when the anatomy is accurate.
Practice gesture drawing to capture movement and attitude quickly.
Start with simple stick-like gestures. Then build forms around them.
The Biggest Beginner Character-Design Problem
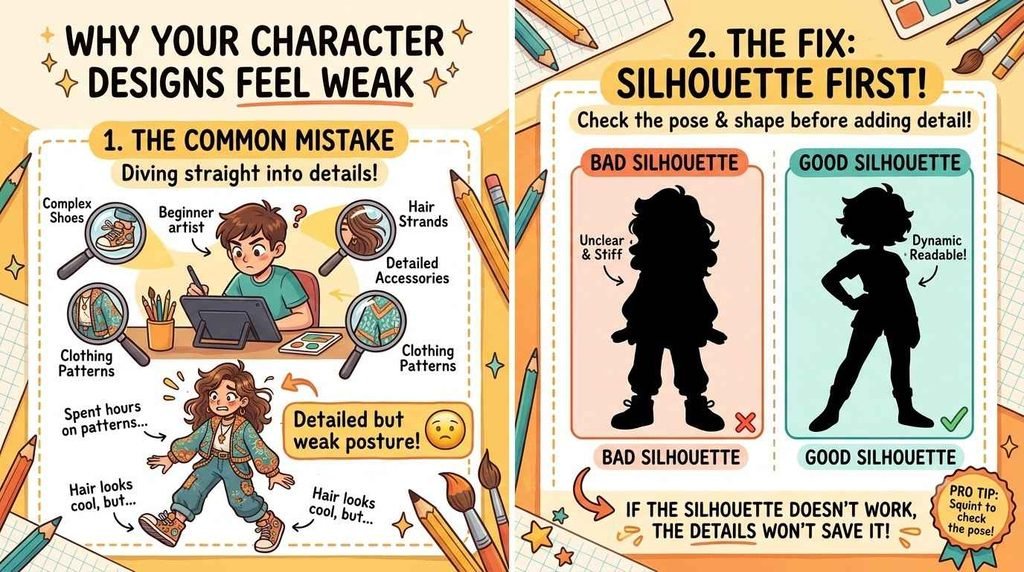
A common roadblock is adding details before solving the character’s overall design.
Beginners often spend time drawing hair, shoes, accessories, and clothing patterns before checking whether the character’s silhouette works.
This creates a detailed character that is still visually weak.
Work from large to small:
Silhouette → proportions → pose → clothing → facial features → small details
If the character does not work as a simple silhouette, details probably will not fix it.
Step 1: Start With Simple Shapes
Pick a basic character idea.
For example:
A nervous young inventor.
Do not immediately draw a finished character.
Create ten tiny thumbnails using different combinations of shapes.
Try:
- Round body + large head
- Tall rectangle body + narrow head
- Triangle torso + long limbs
- Short wide body + small head
- Angular shapes + oversized hands
You are testing visual ideas.
The best thumbnail becomes the starting point for the next stage.
Step 2: Build a Strong Silhouette
Turn your favorite thumbnail into a solid black shape.
Look at it from a distance.
A strong silhouette should communicate the character’s body type, pose, major clothing shapes, and overall attitude.
Avoid relying on tiny facial details to make the character recognizable.
Try three different poses:
- Standing
- Walking
- Reacting to something
If the silhouette remains recognizable across all three, you have a stronger foundation.
Step 3: Think About Proportions
There is no single correct character proportion.
Realistic proportions and stylized proportions serve different purposes.
A children’s book character might have an oversized head. A superhero might have exaggerated shoulders. A cartoon creature might have tiny limbs.
The important thing is consistency.
Once you choose your proportions, keep them consistent when drawing the character from different angles.
Step 4: Add Personality Through Pose
Personality should not exist only in the character’s facial expression.
Think about how the character stands.
A confident character might occupy space differently from a nervous character. A tired character may have a different posture from an energetic one.
Draw the character without facial features.
If you can still sense the personality, the pose is doing useful work.
Step 5: Design the Face and Expressions
Once the body works, move to the face.
Create an expression sheet.
Try:
- Happy
- Angry
- Sad
- Surprised
- Confused
- Excited
Do not change the character’s basic facial structure randomly between expressions.
Keep the key features recognizable.
Study how the eyebrows, eyes, mouth, cheeks, and head angle change together.
Step 6: Add Clothing With a Purpose
Clothing should tell the viewer something.
Ask:
Where does this character live?
What do they do?
What kind of personality do they have?
What visual shapes support the character?
Avoid adding accessories simply because the design feels empty.
A few meaningful choices can communicate more than dozens of decorative details.
For example, a tool belt might communicate a character’s job. Oversized practical clothing might suggest a particular personality or lifestyle.
Step 7: Create a Character Sheet
Once your design starts working, make a simple reference sheet.
Include:
- Front view
- Side view
- Back view
- Three expressions
- Three poses
- Important props
- Main colors
- Clothing details
This sheet becomes your visual reference.
It is especially useful if you plan to use the character in comics, animation, children’s books, games, or a series of illustrations.
How to Practice Character Design Without Getting Overwhelmed
Do not create a brand-new character every day.
Pick one character and keep developing it.
Try this weekly routine:
| Day | Practice |
|---|---|
| Monday | Shape thumbnails |
| Tuesday | Silhouette variations |
| Wednesday | Gesture and poses |
| Thursday | Facial expressions |
| Friday | Clothing and props |
| Saturday | Character sheet |
| Sunday | One finished illustration |
This gives you repetition without making every session identical.
You can also study existing characters, but use them for analysis rather than direct copying.
Ask what makes their silhouette recognizable. Look at their proportions, color choices, shapes, and expressions.
Then apply one idea to an original character.
Do You Need Strong Drawing Skills First?
You do not need to be an advanced artist.
But basic drawing fundamentals will make character design easier.
Study:
- Simple forms
- Gesture
- Proportion
- Perspective
- Basic anatomy
- Light and shadow
You do not have to master anatomy before designing stylized characters.
However, understanding the underlying structure gives you more control when you exaggerate or simplify the body.
What If Your Characters Look Generic?
This is common.
Instead of adding random details, change the big visual decisions.
Experiment with:
- Body proportions
- Silhouette
- Head shape
- Limb length
- Clothing shapes
- Hair shape
- Color palette
- Pose
Create five variations of the same character concept.
Then compare them side by side.
Usually, one or two versions will have a clearer personality.
What Should You Learn After Character Design?
Your next skill depends on where you want to take your characters.
For children’s books, study visual storytelling, page composition, color, and sequential illustration.
For animation, study gesture, acting, turnaround drawings, and movement.
For comics, study panel composition, expressions, perspective, and visual pacing.
For games, study character sheets, concept art, costume design, and production workflows.
For illustration, study composition, environments, lighting, and rendering.
Character design is rarely an isolated skill. It becomes more valuable when you can place your characters inside convincing stories and environments.
Your Day-One Action Plan
You can start character design with one sheet of paper.
- Draw ten tiny character silhouettes using different combinations of circles, squares, and triangles.
- Choose your strongest silhouette and draw it in three different poses.
- Create three facial expressions while keeping the character’s proportions consistent.
Do not worry about polished rendering yet.
Your first goal is to learn how shape, silhouette, proportion, pose, and expression work together.
Keep the design simple. Repeat it from different angles. Add details only when they support the character.
That is how you move from drawing random characters to designing characters with a clear visual identity.